
In my previous blogpost, I created a simple chatbot using LUIS and the Microsoft Bot Framework. This demonstrates the concept of using a Natural Language Processor for a natural flow of conversation. The input from the user gets translated into an intent that can be used to perform various defined actions or responses. However, this lacks 'intelligence'. It would take a significant amount of time to develop lots of custom answers and commands that can be triggered. Especially if their only goal is to make the chatbot seem more… human.
That's why I'll be adding some knowledge into this TostiBot. The main goal is to make the bot respond to common answers or remarks without the necessity to code every single mapped input and output. You can follow this guide to get started with the QnA Maker and connect its service to an existing MBF bot.
Time for a QnA
Mapping input and output for the sole purpose of adding common phrases in a chatbot is easily done with the QnAMaker service in the Azure Cognitive Services domain. The QnAMaker service is basically a knowledge base filled with mapped entries. It even comes with lots of dummy data to make your bot look intelligent with just a few clicks. Which is exactly what I'll be doing in this blog.
Besides the 'dummy'-data there are more advantages of the QnAMaker Service:
- Ability to add documents (PDF/Excel/Docs etc) which will be auto mapped into questions and answers if it can find any
- Choose between four kinds of chitchat data, according to the formality of your chatbot
- Easily integrate it within an existing MBF chatbot
- QnaMaker portal just like LUIS.ai
Creating a QnAMaker service
To create the QnA service go to the Azure portal and Create a Resource -> Search for 'QnA Maker' and hit Create.
As we're used from Azure it's possible to select a Free tier to get started with development. The Azure Search is required for the Knowledgebase that is used as storage. Again, a free tier is available.
Once you have created the resource, 5 resources have been added to the selected resource group.

Exploring the QnA Maker
When navigating to www.qnamaker.ai and logging in using the same credentials as for the Azure portal, you will be able to skip the first step of adding a knowledge base. Step 2 will require some input to connect the Knowledgebase to the existing Service. Choose a name for your knowledge base that implies its usage. It's possible to connect multiple knowledgebases so using a naming convention could eventually be very helpful.
For the TostiBot I have added chitchat. This is a predefined mapped QnA set of commonly used entries. The TostiBot is a funny guy, so I've chosen the Comic set. If you don't have access to a mapped file of your own, or an online FAQ, it's possible to add mapped entries later on.
Adding the QnAMaker to the TostiBot
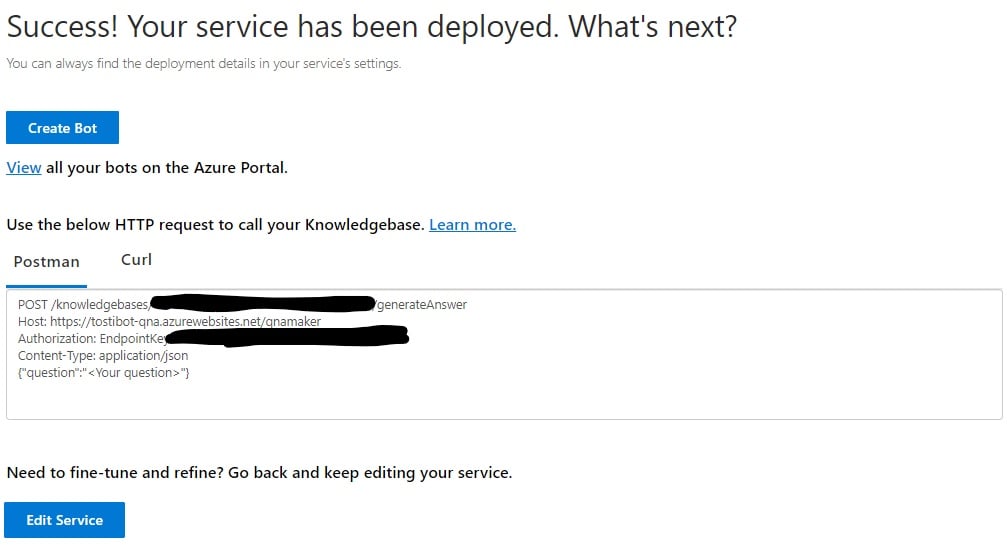
After the knowledge base is created it's time to add the knowledge to the bot to make it look more real. If you've chosen a chitchat set in the previous step you can publish the service right away. The settings on the screen can be used to connect the service to the TostiBot.
So how do we do that? We head back to the TostiBot solution, enter a line of code and tadaa? Well... Almost!
First, we add the service to the .bot file. Unfortunately, we cannot do this by simply adding code. The .bot file is basically encrypted. Therefore we have to work around the encryption of the .bot file by using command line. To do this, install msbot (NPM Package). The following command can be used in a terminal to do so (Make sure you have NodeJS installed):
npm I -g msbot
Then navigate in a terminal to the directory of the .bot file. Here enter the following command. Make sure to use the right parameters.
msbot connect qna --secret [ENDPOINT SECRET] --name [NAME OF YOUR SERVICE ]--kbId [KNOWLEDGE BASE ID] --subscriptionKey [SUBSCRIPTION KEY] --endpointKey [ENDPOINT KEY] --hostname [HOSTNAME OF THE BOT SERVICE] --bo [.BOT FILE]
Knowledgebase ID can be found by navigating to the knowledge base in the QnAMaker portal and then inspecting the URL. Hostname is the URL of the service (typically https://yourbot-qna.azurewebsites.net). Subscription key can be found in the Keys tab of the QnAMaker service in Azure. Endpoint key and hostname are located in the Http examples of the QnAMaker Knowledgebase after publishing, or on the settings page.
One last thing, before we can do some fun stuff with the code, is adding the service programmatically. Copy paste the following code in the switch located in BotServices.cs. Also, install the Microsoft.Bot.Builder.Ai.QNA Nuget package to use the QNA SDK.
case ServiceTypes.QnA:

{

    var qna = service as QnAMakerService;

    var qnaEndpoint = new QnAMakerEndpoint()

    {

        KnowledgeBaseId = qna.KbId,

        EndpointKey = qna.EndpointKey,

        Host = qna.Hostname,

    };

    var qnaMaker = new

QnAMaker(qnaEndpoint);

    QnAServices.Add(qna.Name, qnaMaker);

    break;

}
Something the Microsoft docs don't tell you is to also add the following dictionary in order to add multiple QnAMaker services if you want.
public Dictionary<string, QnAMaker> QnAServices { get; } = new Dictionary<string, QnAMaker>();
When that is done the service is connected to the bot. Now it's time to add some 'consciousness' if you please :D.
In the BasicBot.cs add the following line:
public static readonly string QnAMakerKey = "QnABot";
This is purely to identify the QnA Service settings in the .bot file. By making it a read-only property we won't make any spelling mistakes later on.
Now… The only thing I have done programmatically to add the knowledge to the bot is to catch all NoneIntents and GetTostiBotInfoIntents and send the user's input to the QnA Service. The GetTostiBotInfoIntent is created to identify calls that could, later on, require more detailed answers. These calls will get stored in the LUIS endpoints review tab in luis.ai.
case GetTostiBotInfoIntent:

case NoneIntent:

default:

     // No intent was found, or the user requests some basic chit chat response.

     await GetQnAResult(turnContext, cancellationToken);

     break;
The code that performs the call to the QnAMaker is a simple rest function. Knowledge-based implementations of AI are pretty common and not very 'intelligent'. But they do give quick access to mapped entries for a covered conversation.
private async Task GetQnAResult(ITurnContext turnContext, CancellationToken cancellationToken)

{

    // Get the response from the QnA Maker

    var response = await _services.QnAServices[QnAMakerKey].GetAnswersAsync(turnContext);

    if (response != null && response.Length > 0)

    {

	await turnContext.SendActivityAsync(response[0].Answer, cancellationToken: cancellationToken);

    }

    else

    {

	// No response/ Q-A combination found. Return some default text to the user.

	var msg = @"I don't know what to say... I'm just a simple Tosti Bot.";

	await turnContext.SendActivityAsync(msg, cancellationToken: cancellationToken);

    }

}
A human-like TostiBot
It took me less than an hour to get this up and running. Adding chitchat using the predefined sets of mapped entries provided by the QnAMaker is a very easy way to add a natural flow of conversation to your bot. It makes sure the bot won't reply with 'I don't know what to do with that' every time it encounters an undefined intent or utterance.
In this blog, I've only used the chitchat set. But of course, it's also possible to add business intelligence. Online FAQ's are a good way to start as they tend to know the commonly asked questions.
If you got any questions or suggestions please feel free to contact me. I've tried to keep this as simple as possible, but obviously, the possibilities are endless.
I hope you've had a good read and make sure to follow @Mavention on Twitter to keep up to date with our blogs.


