It’s a common known business example: a flow that calls other flows to run after each other. This setup is also called nested flows or running child flows. Previously, this could only be done by calling the child flow with an HTTP request. But since the end of last year, Microsoft introduced a new action called Run a child flow that allows you easily use nested flows without complicated (and unsecured) HTTP requests which also happens to be a premium connector, so without an extended license, you cannot even use it. In this blogpost, I will explain how you set up a nested flow configuration.
Solutions
First thing to know, is that this configuration only works inside Solutions (for the time being). Basically, Solutions are introduced to provide better ALM (Application Lifecycle Management) for Power Apps and Power Automate. More information about Solutions can be found here.
Configuration
I will explain how to set up a nested flow configuration by the following example:
SharePoint
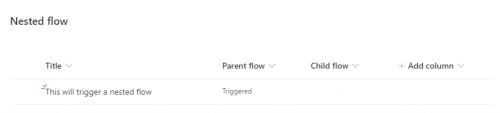
Within SharePoint, a configured a simple list that contains the following fields:
• Title
• Parent flow - this contains the status of the parent flow
• Child flow - this contains the status of the child flow
This is a very basic setup, purely to show you the concept of a nested flow configuration.
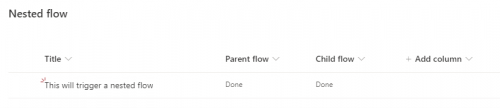
- The parent flow will update the Parent flow field from 'Triggered' to 'Done', the Child flow field to 'Triggered' and will start the child flow
- The child flow will then update the Child flow field from 'Triggered' to 'Done'
You can configure your parent and child flows as you want, as long as you stick to the basic configuration as explained below.
Solution
Before we can start building our flows, we need to create a new Solution. You can do this as follows:
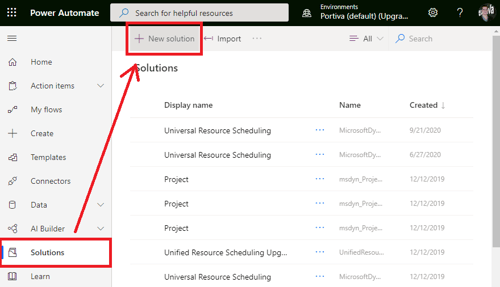
- Go to the Power Automate portal (https://flow.microsoft.com)
- Click Solutions (bottom left)
- Click + New solution (top left)
-
Enter a Display name and select (or create a new) Publisher. You can select Default Publisher for <org> if you don’t want to use a dedicated Publisher
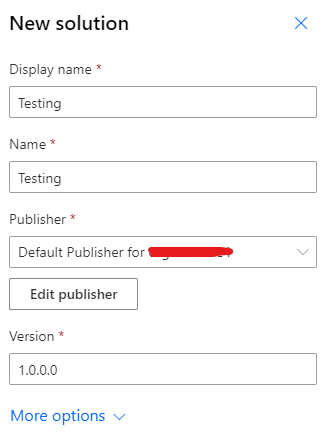
- Click Create. Your Solution will now be created instantly.
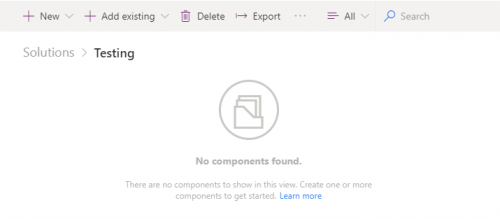
- In the Solution overview, click your newly created solution. This will bring you to the components overview, which is empty at this point.
Child flow
Now that our Solution has been created, we can proceed by setting up our nested flow configuration. You need to start with the child flow, otherwise you cannot call it from your parent flow so it’s important that you write out your nested flow configuration before you start building it!
You can create a flow inside your Solution by clicking the + New button and select Flow from the dropdown. This will guide you to the flow designer.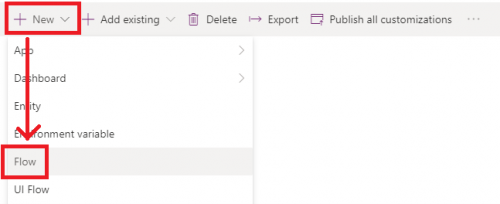
The trigger for a child flow is the Flow button for mobile – Manually trigger a flow.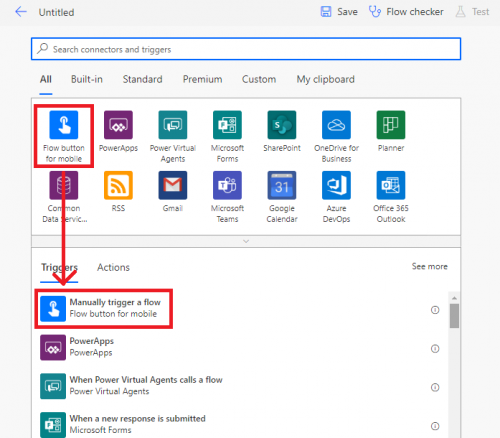
This action allows you to ask the parent flow for parameters to be passed from the parent flow to the child flow by using the + Add an input button. There are 6 types of data that can be requested:
• Text
This is a text attribute that expects a string. It also allows you to configure a (multi-select) dropdown control. You can do this by selecting the ellipsis button (…) and selecting either Add a drop-down list of options or the Add a multi-select list of options. By selecting one of these options, you will be prompted for the list of options.
• Yes / No
This is a Boolean attribute that expects one of 2 options
• File
This is a file picker attribute that expects the file content of a document or a picture
• E-mail
This is a people picker attribute that expects an user (e-mailaddress)
• Number
This is a number attribute that expects a numeric value
• Date
This is a date picker attribute that expects a date value
For each parameter, you can determine of the parameter needs to be required or not by selecting the Make the field optional or the Make the field required option from the ellipsis button (…).
The first field of the parameter configuration is the Display name of the parameter. The second field is the Description of the parameter. Both will show up in your parent flow so choose these values carefully. Also note that you can only configure up to 20 parameters.
In this example, we want the child flow to update a SharePoint item, so we need to provide the flow with an item ID, which can be provided with the Number parameter.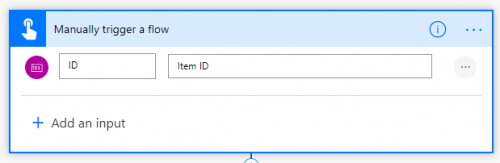
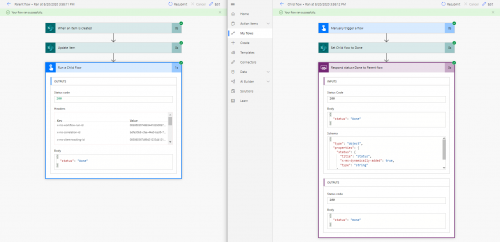
After this, you can configure the flow as you want. I only added an Update item action that used the ID parameter to update the SharePoint item.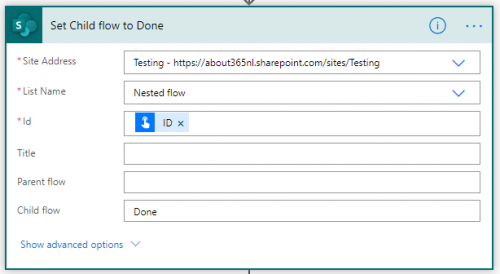
When you’re done configuring flow, you need to add one more action to let your parent flow know that the child flow has finished. You can do this by adding the Respond to a PowerApp or Flow action (which is part of the PowerApps connector)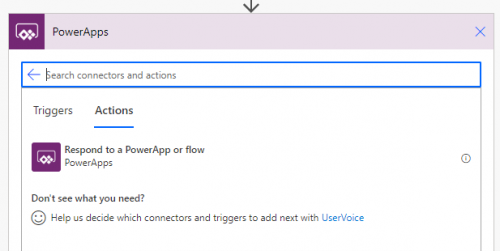
You need to configure an output that will be sent to your parent flow by using the + Add an output button. You can then choose which type of output you want to give (the same types as the Input parameters from the Manually trigger a flow trigger) and assign a Title and Value to them. In this case, I only want the parent flow to know that the child flow ran succesfully so I used the Text parameter status which contains the value Done.
You can pass all sorts of information back to the parent flow so that the parent flow can handle these values after the child flow has completed. That’s up to you.
One final thing we have to do before this Child Flow can be called from the parent flow is to make sure the flow runs on a specific connection. By default, the connection used for a ‘For a selected item’ trigger is set to Provided by run-only user. This has to be changed to a specific connection (e.g. the flow owner’s connection), otherwise the flow cannot be called from the parent flow.
To do this, you must go to the home page of your flow and click on the Edit link of the Run only users section (bottom right):
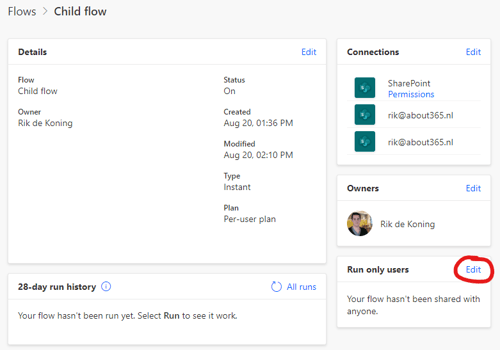
On the Manage run-only permissions pop-out, make sure you set the Connections User section for all connectors (in this example we only have the SharePoint connector) to a specific connection instead of the default Provided by run-only user selection. This can be any connection you want, as long as it has sufficient rights to that data source.
Parent flow
Creating the parent flow is the same as creating the child flow. The trigger can be anything you want; in this example, I want the flow to trigger when a new item is created inside the SharePoint list. The configuration of the flow can be anything you want.
At the point that you want the child flow to kick off, you need to add the Run a Child Flow action (which is part of the Flows connector)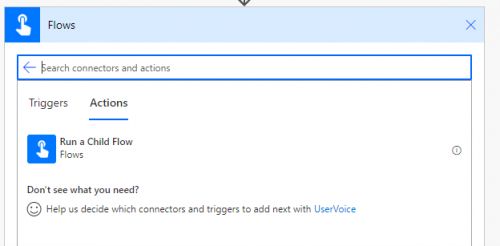
Within this action, you must select which flow you want to start. Depending on the parameters set on that flow, you need to fill them in as well. In our case, we only need to fill in the ID of our SharePoint item, which can be retrieved from the Dynamic Content of our When an item is created trigger.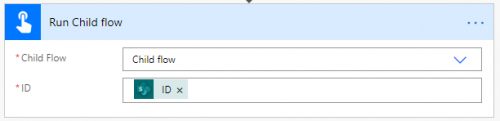
When this action is triggered, the Child flow will start and the parent flow will wait for it to finish. After that, the following set of actions (if configured) will be started, which can make use of output parameters from the child flow (again, if configured).
In this example, there are no actions configured after the child flow has been triggered, so that means the end of our nested flow configuration.