
I recently came across a scenario where a client requested that when employees submit a certain HR application form (which in fact was a SharePoint Online list), the permissions needed to be removed and set in such a way that only a specific group had access to it for review and administration purposes. In other words: we had to break the default permission inheritance and set up unique permissions on list item-level.
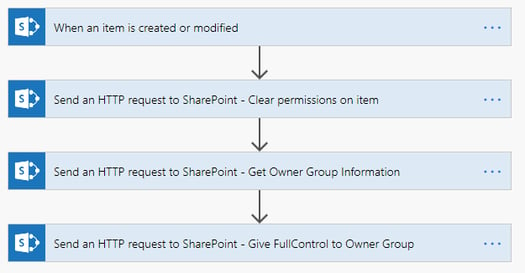
We decided to use Microsoft Flow to automate this task, see the result in the screenshot below. It mainly uses HTTP requests to the SharePoint REST API. I’m going to walk you through it so you can build and use it yourself.
Build the Flow
Go to https://flow.microsoft.com/ and log in with your Office 365 account.
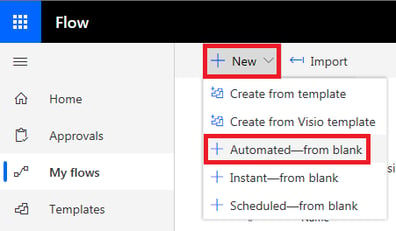
In this example we start with a blank canvas and build the Flow ourselves. Therefore, click the +New button and select “Automated – from blank”.
Step 1
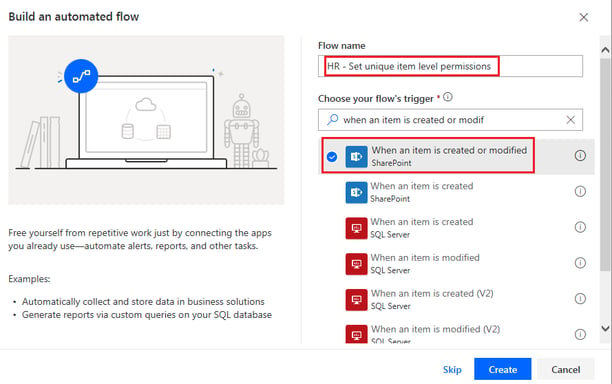
Provide a name and select what will trigger (or start) the Flow. In our case this will be “When an item is created or modified” (for the folks who have their language set to Dutch, it’s “Wanneer een item wordt gemaakt of gewijzigd”). Then click the blue Create button.
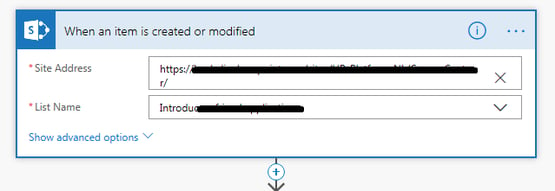
Enter the site address (URL) and select the list on which you want this Flow to run:
Click the little blue plus icon below this first step to add a new action.
Step 2
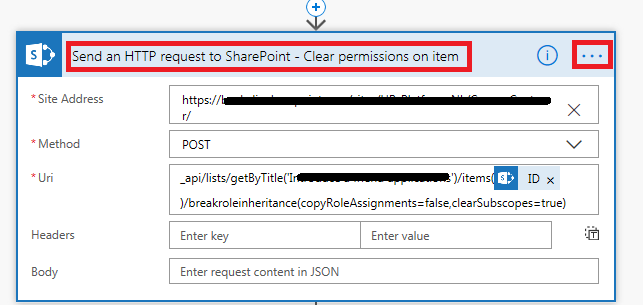
Search by typing “Send HTTP” in the search bar and you should find the action “Send an HTTP request to SharePoint” (in Dutch “Een HTTP-aanvraag verzenden naar SharePoint”).This action will break the permissions inheritance of the list item and remove all permissions from it.
TIP: to improve the readability and administration of the Flow, it’s considered best practice to provide a clear descriptive name in the header of the action (the light blue part below). You can customize this by clicking the three horizontal dots (ellipsis) on the right hand side of the header and then select “Rename”.
Configure the fields as follows:
Site Address: the site URL.
Method: select “POST”.
Uri field: enter the following text:
_api/lists/getByTitle('List Name')/items(['ID'])/breakroleinheritance(copyRoleAssignments=false,clearSubscopes=true)
This request contacts the SharePoint REST API and focuses on a specific list. Replace the red marked part with the name of your list.
The list ID element (blue part in screenshot above) can be selected in the Dynamic content window that will appear in the Uri field once you enter this code.
Every item in a SharePoint list has its own ID number, that’s what this part “/items(['ID'])” of the request is looking at, so it knows on which list item it has to perform the next action, which is to break permission inheritance and remove the existing permissions, stated as: “breakroleinheritance(copyRoleAssignments=false,clearSubscopes=true”
Step 3
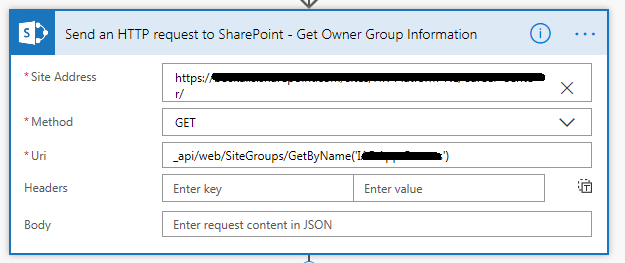
Next, we want to assign permissions to a specific group of people, so they can access the item. I already created a SharePoint group with the right people in it. Now we will grant that group access and assign it a permission level.
To do so, add another “Send an HTTP request to SharePoint” action. This part looks at the site groups and retrieves the group you specify:
Fields:
Site Address: the site URL.
Method: select “GET”.
Uri: Enter the following text (replace the red part with the group’s name):
_api/web/SiteGroups/GetByName('Group Name')
Step 4
As the fourth and final step, add yet again a “Send an HTTP request to SharePoint” action and provide the following values:
Again, fill out the Site Address field with the site URL.
Select “POST” for the Method field.
At the Uri field, type or copy:
_api/lists/getByTitle('List Name')/items(['ID'])/roleassignments/addroleassignment(principalid=['d']['id'],roledefid=1073741829)
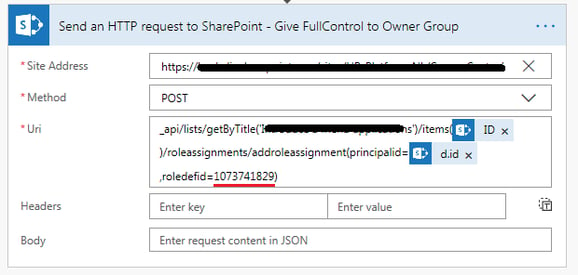
This request focuses, again, on a specific list, then targets a specific list item (that’s the items/ID part).
Then, in the next part “roleassignments/addroleassignment(principalid=['d']['id']…” it gets the group that needs to be granted access.
I think this part of the Flow is probably the most complex. Basically, it gets the group that was defined in the previous step. When you look at the code (click the ellipsis (the three horizontal dots) in the header, then select Peek Code) you can see this reference:
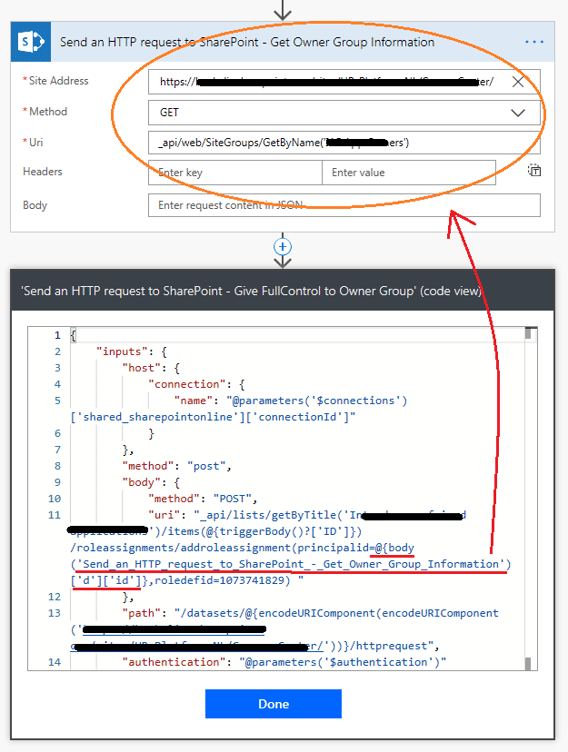
The final part of this request assigns a permission level to the group, that’s the “roledefid=1073741829” part. Which permission level depends on the value you use (the orange numbers). Below you can see various permissions levels and the associated ID number:
Full Control: 1073741829
Read: 1073741826
Contribute: 1073741827
Source: http://codelesssharepointinfopath.com/tag/roledefid/
So in this case we’re granting the group full control permissions (note that we have also included this information in this step’s header description, where it says “Give Full Control to Owner Group”).
And that’s it, the Flow is now ready to run.
Thanks to my colleagues Melvin and Staffan for helping to build and optimize this Flow.

